
How to Make an AI Video Ad
I made a 30 second commercial with two of me in it, talking to each other, in one generation. This is the entire process, including the parts that went wrong.
Everything below is what I actually ran. The numbers are from my own account.
The tools
Worth stating up front, because the how matters as much as the what.
| What | Tool | Cost |
|---|---|---|
| Video generation | Seedance 2.5, driven through the Higgsfield MCP server | paid, per credit |
| Character sheets | ChatGPT, built in image model | free tier |
| Location plate | ChatGPT, built in image model | free tier |
| Cheap test stills | Nano Banana, via Higgsfield | 2 credits each |
| Voice trim, end card, captions | ffmpeg | free |
The Higgsfield MCP part is worth calling out. Rather than clicking through a web interface, I drove the whole thing from an agent: submitting renders, polling jobs, pulling frames back down to inspect them, and reading the actual model constraints off the API instead of guessing at them. That is how the duration ceiling, the credit costs and the reference roles in this article were established. Every number here came from the API, not from a marketing page.
It also made the cheap-test habit practical. Generating a still, downloading it and looking at it is three commands, so checking a frame before committing to a render stops being a chore.
The one idea
Everything you do not decide in advance, the model decides for you, and it decides differently on every run.
That is the whole discipline. Consistency is not something you prompt for. It is something you supply.
Most people open a video model, type a paragraph, and ask it to invent the character, the room, the light, the pacing and the performance at once. It does exactly that, differently every time. Then they blame the model.
What it costs
Prices are for Seedance 2.5 on Higgsfield, in credits. On a $49 per month plan you get 1,000 credits, so one credit is about five cents.
| What | Credits | Roughly |
|---|---|---|
| 30s video at 480p | 75 | $3.75 |
| 30s video at 720p | 195 | $10 |
| Single 1k image | 2 | $0.10 |
| Single 4k image | 4 | $0.20 |
480p works out at 2.5 credits per second, 720p at 6.5. Aspect ratio makes no difference to price.
My total: about 918 credits, roughly $45, across eight video renders and a handful of test images. The finished spot was one of those eight.
The character sheets cost nothing. I generated both of them on the free tier of ChatGPT, using its built in image model. Same for the location plate. The only thing I paid for was the video generation itself, which means the entire reference set behind this ad was free.
The build order
Six of these eight steps cost nothing. That ratio is the point.
1. Write the script as a performance
Timing has to be written down. "He laughs" gives you a two second laugh that wrecks the pacing. "He laughs for half a second" gives you a beat you can cut on.
Put a duration on every reaction and every pause. Write the ambience you would actually hear standing in that room, and write background life into every shot, because the model will not add either on its own.
2. Storyboard as stick figures
Board every shot as rough mannequins, no faces, no likeness, before generating anything photoreal. It costs almost nothing and it is where the expensive problems surface.
Mine caught two: a broken 180 degree axis, and furniture that changed between panels.
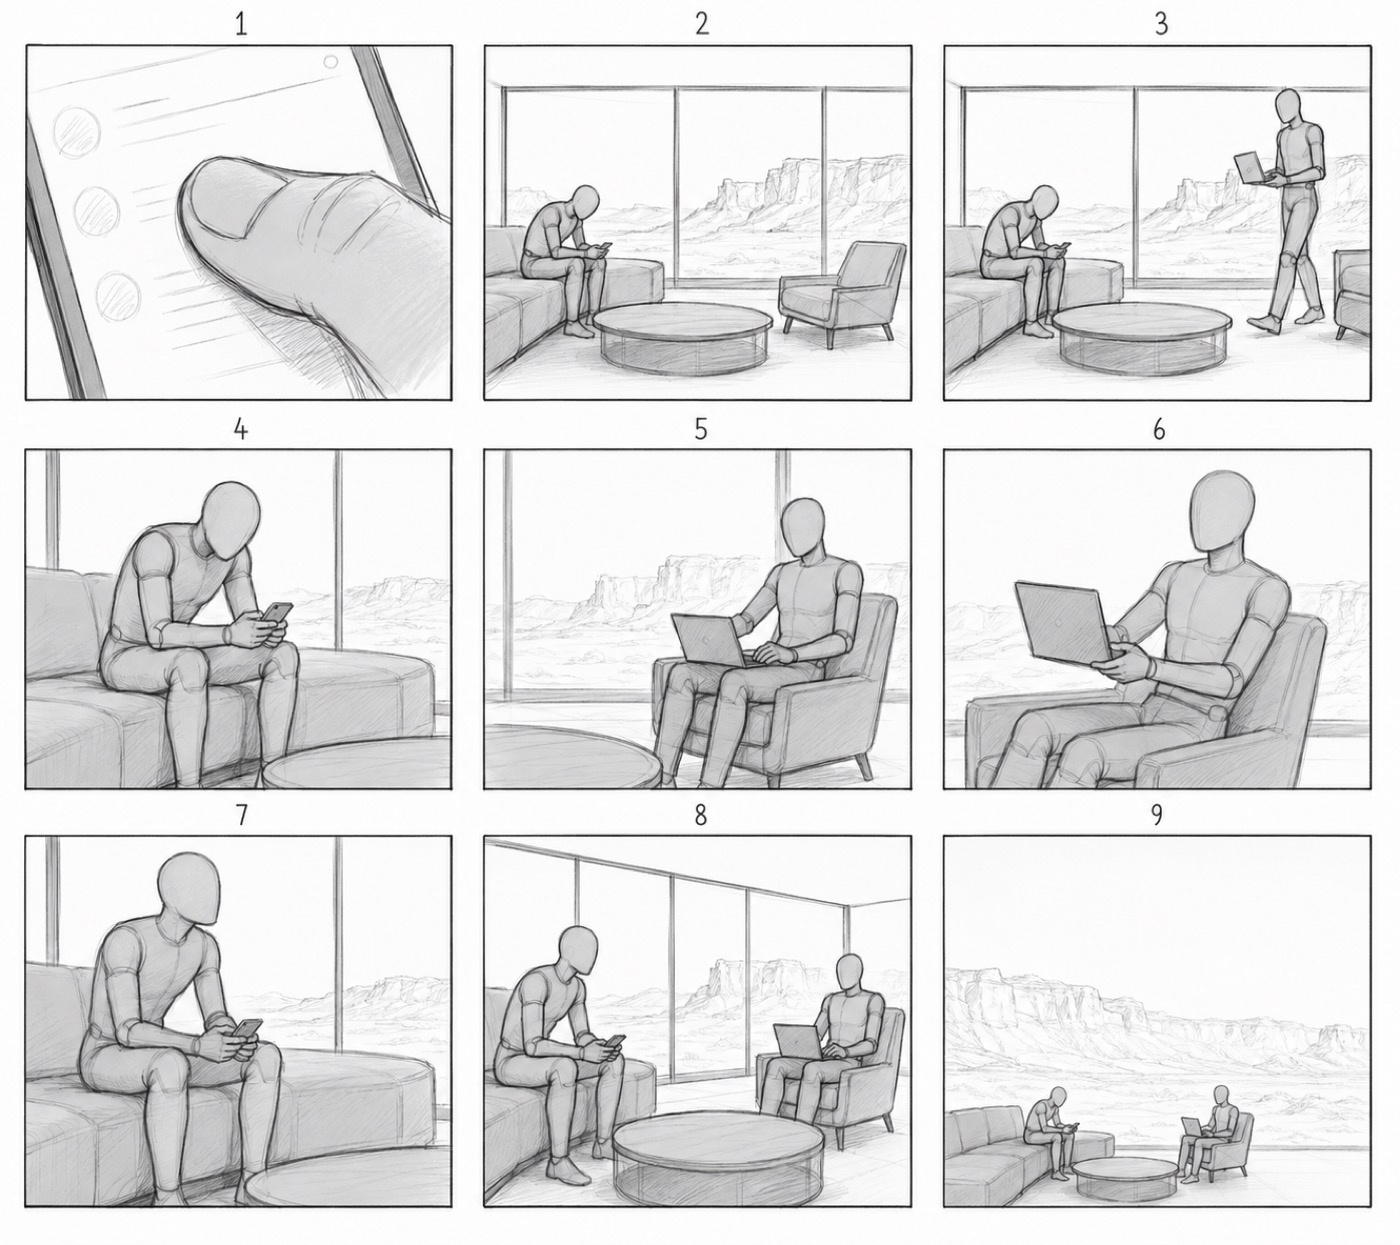
The fix worth stealing: write one paragraph describing your location and paste that identical paragraph into every panel prompt. The room stops drifting immediately. Fix handedness once and never flip it.
3. Character sheets from one photograph
A character sheet is one image holding six angles of the same face, a row of expression studies, a macro close up of the skin, and a full body against a height scale.
I made both of mine on the free tier of ChatGPT, with its built in image model, from a single photograph of my face. No subscription, no separate image tool. If you can upload a photo and paste a prompt, you can produce these.
Pick a model that renders real skin. The macro inset is the test: you want visible pores, individual beard hairs and real sub-surface light. Whatever gets baked into your sheet is inherited by every shot in the film, so plastic skin at this stage is plastic skin in the final render.
Two things that matter more than the prompt:
Supply a real height. If you leave it out the model invents one, and two sheets of the same person will disagree. Mine came back at 182.9 cm, and that number then had to appear verbatim in the second sheet.
Separate two characters by tone, not detail. Mine were one light and broken up, one a solid block of black. That difference reads at wide shot scale and in silhouette. A subtle difference never will.
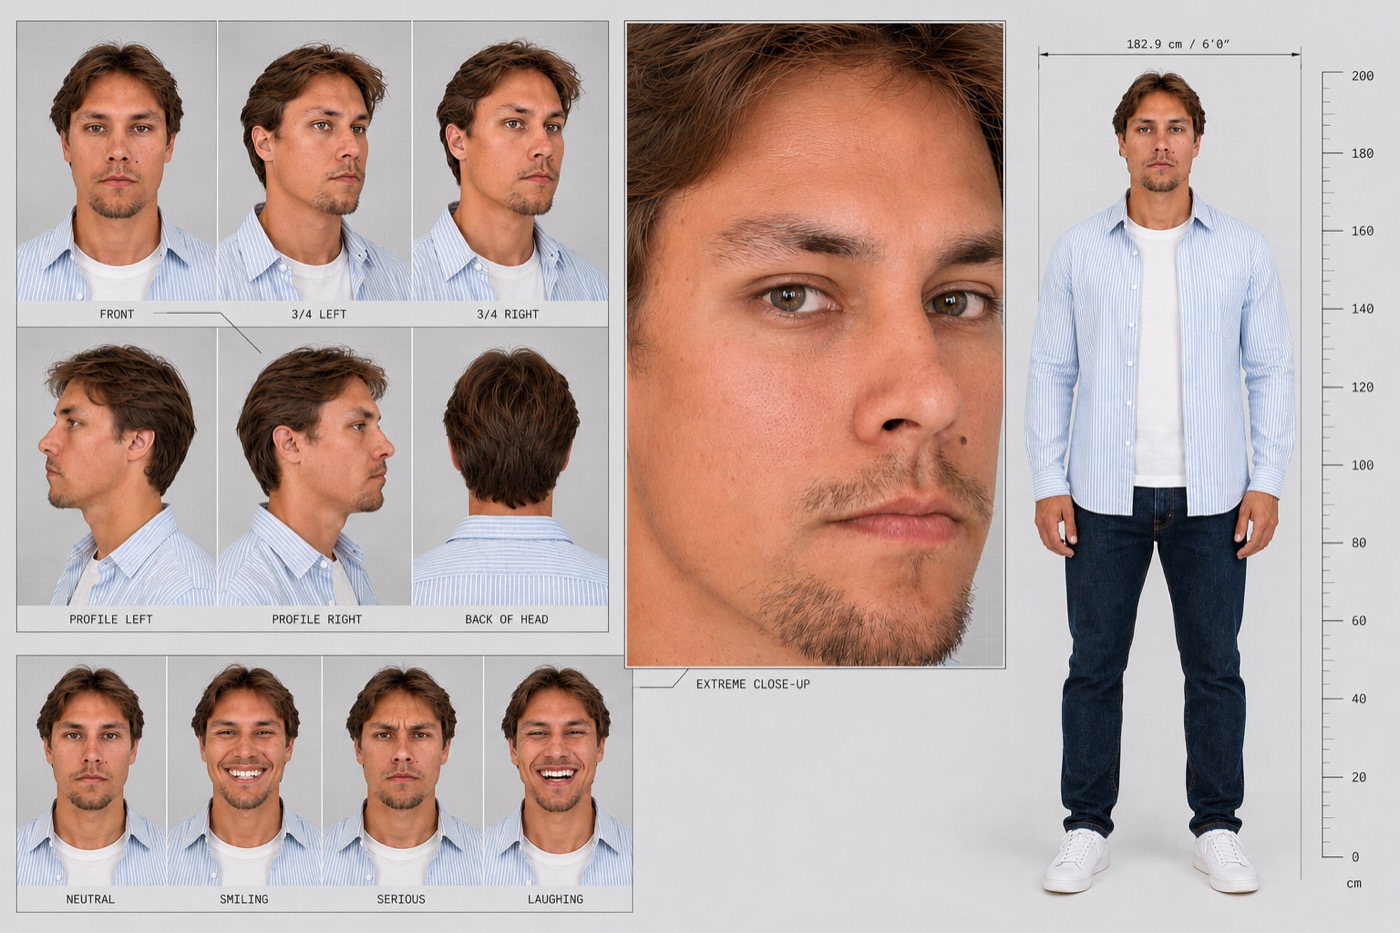
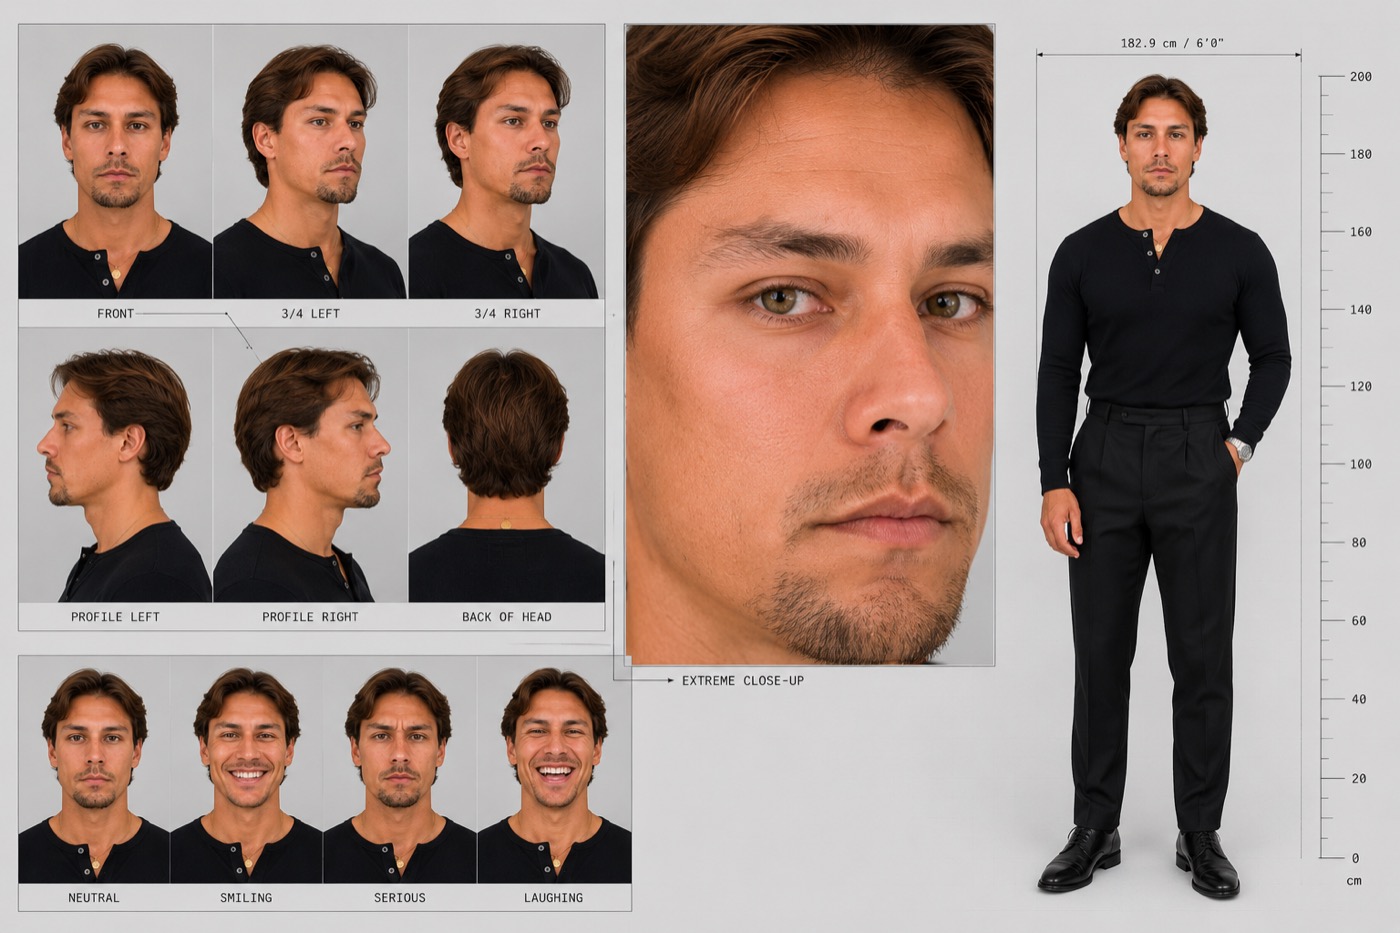
If your sheet comes back looking like a better looking version of you, add an explicit failure condition to the prompt: name that idealising, slimming or smoothing the face makes the sheet wrong. Image models beautify by default.
4. One location plate, not three
The location reference locks your colour grade. Every shot inherits it.
Generate one master frame carrying the whole space, not one per area. Three plates will come back three different colours, and plates that disagree cannot lock anything.
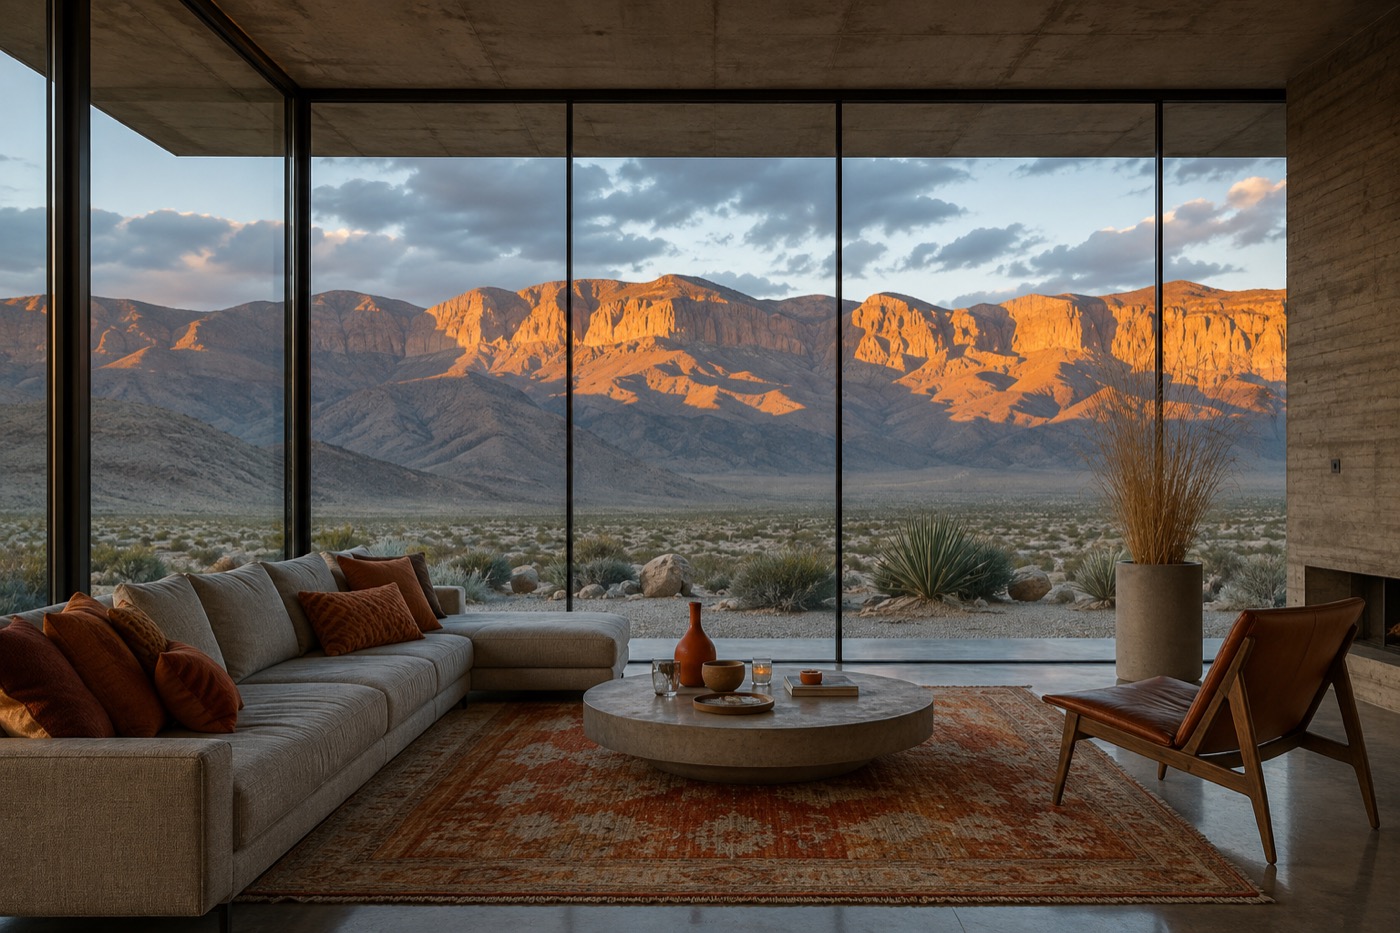
Then read the grade off the finished plate and write it into the prompt as a named string you keep byte identical across every revision. Mine:
Mesa Gold grade: burning amber ridge-face as the hero tone, cool mauve-grey
mountain shadow beneath it, pale blue sky with peach-lit cloud undersides, sage
and bone desert scrub, greige linen and rust terracotta interior textiles, warm
tan rammed-earth and cool grey concrete base, soft warm bounce off the concrete
floor and rug lifting faces off the background, brown-tinted shadows that never
fall to pure black.
That last clause about bounce is not decoration. My interior was much darker than the window, and without stating the bounce every face fell to silhouette.
5. The voice reference
Record about sixty seconds, one take, dry. No EQ, no compression, no noise reduction.
Then cut roughly ten seconds out of it. This matters, see finding 4 below.
ffmpeg -i voice.mp3 -ss 6 -t 10 -c:a libmp3lame -b:a 192k voice-10s.mp3Name the accent explicitly on every single line of dialogue, not once at the top.
6. The prompt
Open with a fixed technical block, unchanged every run:
Arricam LT, Cooke S4/i primes, 35mm Kodak Vision3 500T, 9:16 vertical spherical,
T2.8, shallow depth of field, halation on highlights, fine organic grain, lifted
milky blacks, low contrast, no sharpening, no HDR.
Then the named grade. Then an audio block, because the single least recoverable mistake is letting the model generate music. Once a music bed is mixed into the track you cannot separate it from the effects.
AUDIO: sound effects and natural ambience only. No music, no score, no
soundtrack, no musical instruments and no rhythmic bed of any kind at any point.
Every sound is diegetic, sound that physically exists in the room. Plus the
spoken dialogue. Nothing else.
Then the shots, each opening with a bracketed timestamp.
Four rules carry most of the weight. One action per shot. Subject and action inside the first twenty words. Name your reference images inline in the shots that use them. Keep motion alive through the final shot.
Never write "locked off" or "static", never name a second camera body, and never use the word "fast", which triggers jitter.
7. Time check the dialogue
Count the words in each shot, convert at 150 words per minute, add the physical actions, and compare against the length you gave that shot. Four minutes of arithmetic saved me a wasted generation.
8. Generate
Test at 480p until the prompt works. Judge picture there, never voice, because voice sounds far more robotic at low resolution than it really is.
12 things that cost me credits to learn
1. Test with stills, not video. An image is 2 credits, a 30 second video is 195. Three separate times a 2 credit still caught a problem that would have cost 195 to find in motion. This is the highest leverage habit in the whole process.
2. Bracketed timestamps genuinely do force cuts. My first render hit seven of eight planned cut boundaries within 0.4 seconds, with no multi-shot setting enabled. The brackets are the mechanism.
3. Rules in the preamble get ignored. Shot text wins. I put "the laptop screen is never visible" in the preamble and the model showed it twice. Moving the same rule into the individual shots fixed it immediately. If a constraint matters, it belongs in every shot that depends on it.
4. A voice reference must be about ten seconds, not your whole recording. A 70 second file failed three ways: wrapped as video it returned "audio input not found", as raw m4a it failed validation, and as a clean 70 second MP3 it failed again. A 10 second clip cut from that same MP3 submitted instantly. Length was the problem, not format.
5. Upload audio as audio. Wrapping a voice clip in a black screen video is a workaround for interfaces that only accept video. If the API has an audio type, using video makes it fail.
6. Binding a voice appears to cost you cuts. Without a voice reference I got nine cuts. With one bound, six, across three separate runs. Your voice or your edit, seemingly not both.
7. It will not cut inside roughly the first ten seconds with a voice bound. Four consecutive renders merged the opening shots no matter how I phrased it, including writing "hard cut" explicitly. The fix was deleting a shot, not rewording one.
8. Give the model the camera move it keeps defaulting to. I asked for a final crane three times and got three different failures. Specifying the slow drift it kept producing anyway worked first attempt.
9. Never test a fragment in isolation. I rendered a 10 second slice starting mid film to save credits. With no preceding shots to establish staging, the model invented its own and put both characters side by side on one sofa. The full length version staged them correctly.
10. Hide a screen by angle, not by direction. I framed a laptop as "camera sees the back of the lid", which geometrically points the screen at the wrong person. The light on the other character's face then came from nowhere. Showing the laptop edge on, screen angled away, hides it just as well and keeps the lighting motivated.
11. Your location's architecture limits your shots. I wanted a final tilt into open sky. The room's concrete soffit capped the window, so craning up produced more ceiling, not more sky. No prompt fixes geometry.
12. Decline the preset. The platform pattern matched my prompt to a stock preset and offered to substitute it. Accepting would have silently overridden the grade and the technical block, which is precisely what all the earlier work exists to prevent.
The rules that cost money when you break them
Never let the model generate music. One continuous track goes over the finished edit in post.
Keep references to six or seven maximum. Quality drops past that. Mine was four: two character sheets, one location plate, one voice clip.
Run the winning prompt several times and mine the best parts. This is the actual quality mechanism, not prompt perfection. No single one of my eight renders was best at everything.
Anchor any upgrade on what you already approved. When re-rendering at higher resolution, pass the approved version back in as an input. A fresh generation gives you a different room and a different face.
The checklist
- Script written with a duration on every reaction
- Ambience and background life written into every shot
- Every shot boarded as stick figures
- One location paragraph pasted into every panel prompt
- Handedness fixed and never flipped
- A character sheet per character, from a real photo
- A real height supplied, then reused verbatim on every sheet
- Characters separated by tone, not detail
- One master location plate, grade read off it and named
- Voice recorded dry, trimmed to about ten seconds
- Accent named on every line of dialogue
- Audio block forbidding music
- Timestamps tiling the runtime with no gaps
- Dialogue time checked at 150 wpm
- References counted, six or seven maximum
- Tested at 480p before finishing at 720p
Where the work actually is
None of this involves a clever prompt. The prompt is maybe the last five percent.
Three hours went into my thirty seconds, and around ten minutes of that was prompting. The rest was scripting, boarding, character sheets, a location plate and a voice recording, which is close to the exact prep you would do before a real shoot.
AI removed the shoot. It did not remove the filmmaking.